

A long-awaited D&D Beyond tool is making its Alpha debut: Maps! Now, Dungeon Masters can bring their players into a single browser-based play space to share interactive maps from their D&D Beyond digital library to host game sessions.
Maps is another step toward our goal of making it easier to jump into the action of Dungeons & Dragons, no matter how you choose to play, whether that’s on D&D Beyond, with pen and paper, or using our upcoming 3D VTT.
We invite DMs with a Master-tier subscription and their players to dive into the Alpha phase of this exciting new tool! A fair warning: This tool is in Alpha, so bugs and performance issues are to be expected!
Below, we dive deeper into what Maps is and offer a tutorial on using the tool.
- New Features
- What Is Maps?
- Accessing Maps
- Adding a Map
- Uploading and Scaling a Map
- Adding Tokens
- Navigating the Map
- Controlling Tokens
- Fog of War
- Ruler
- Inviting Players to View the Map
- Game Log
- Safety and Feedback Tools
Alpha Testing Phase
Expect bugs and crashes as we put Maps Alpha to the test! We’re starting out slow and steady, focusing on the fundamentals needed for this map-sharing experience, so bear with us.
Over the coming months, we’ll refine features as well as add new ones. For the latest update on Maps, keep an eye on the D&D Beyond Changelog and the Maps homepage.
New Features
Since this article was released, several exciting new features have been added to Maps, and we would love your feedback on them. We’ve recently added the following options and tools and updated the article to include a walkthrough of their functionality:
- Token Toolbar: You now have keyboard-free access to deleting tokens as well as two brand-new features: Hide/Reveal options and Border Color options.
- Ruler Tool: Players and DMs can now measure distances on the map, with the distance automatically scaled based on the map.
- Zoom Controls: You can now zoom in and out using the “+” and “-” buttons in the bottom right-hand corner of the map in addition to the mouse wheel and pinch to zoom, and there’s now a display of your current zoom level.
What Is Maps?
Prep less, play more. That’s our guiding star for Maps, the latest tool for D&D Beyond. Whether you play online or in person, we want Maps to offer a quick and easy way for DMs to connect with players and launch their adventures on D&D Beyond.
With Maps, you can pull official maps and monster tokens from your D&D Beyond digital library to play with. You can also upload your own maps, drop in player tokens, and apply a fog of war. When you’re ready to play, you can invite players who have a free or upgraded D&D Beyond account into the shared play space. The Game Log will help you keep track of dice rolls on the fly.
Maps is in Alpha, so we’ll be adding features and adding more official maps to the tool. The following official adventures are supported in Alpha:
- Adventure Atlas: The Mortuary
- Baldur's Gate: Descent into Avernus
- Bigby Presents: Glory of the Giants
- Candlekeep Mysteries
- Curse of Strahd
- Dragons of Stormwreck Isle
- Ghosts of Saltmarsh
- Giants of the Star Forge
- Icewind Dale: Rime of the Frostmaiden
- Keys from the Golden Vault
- Phandelver and Below: The Shattered Obelisk
- Planescape: Adventures in the Multiverse
- Tal'Dorei Campaign Setting Reborn
- The Wild Beyond the Witchlight
- The Book of Many Things
Although we are setting aggressive goals for ourselves, we have a way to go before we’re ready to officially launch Maps. But we want to give Master-tier subscribers and their players a chance to toy around with this new tool. We're excited to have you on the first step of our journey toward a suite of tools geared toward making D&D more accessible to DMs and the players they journey with.
Accessing Maps
To get started using Maps, you’ll first need a Master-tier subscription. (Not subscribed yet? You can get a one-month free trial to start using Maps today!)
Once you have the Master-tier subscription, navigate to the Maps homepage to:
- Launch Maps
- Read the Maps FAQ
- View our roadmap
- Access the user feedback survey
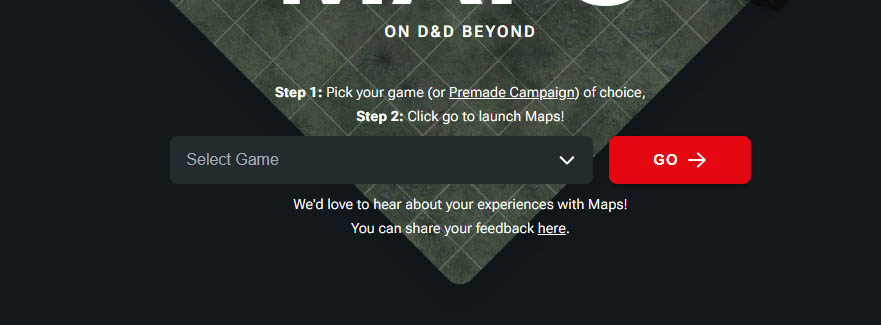
To get this tutorial started, let’s choose one of your existing campaigns. From the top of the Maps homepage, you’ll see a dropdown with a red “Go” button next to it.
From the dropdown, select the campaign you want to set up maps for, and then click “Go.”
Using Maps on Mobile
While Maps isn’t going to be initially optimized for phone and tablet, you can still use your mobile device to access and use maps! You may encounter some areas where the menus or interface don’t quite properly display. Over time, we will work out these kinks and ask for your feedback as we develop this tool.
Adding a Map
You’ll now be loaded into your campaign with a view of the Map Browser and a message saying, "Add a map from a Source to get started."
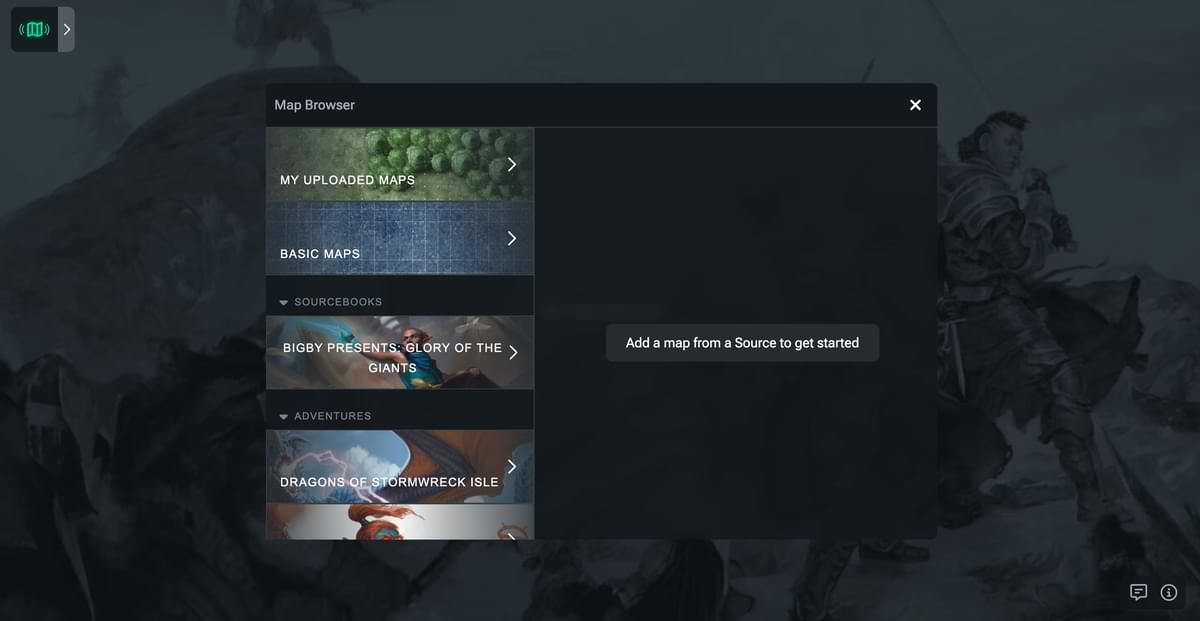
The first two options on the left are “My Uploaded Maps” (we’ll get to that later, don’t worry) and “Basic Maps.” Basic maps are generic maps that can be used for a variety of scenarios, so we’ll be using these further on in this tutorial.
You’ll also see “Sourcebooks,” and, after that, “Adventures.” These two categories are where all the premade maps from the books you own on D&D Beyond will live. For the initial Alpha stage of Maps up to launch, only maps from the following books will be available if you own them:
- Adventure Atlas: The Mortuary
- Baldur's Gate: Descent into Avernus
- Bigby Presents: Glory of the Giants
- Candlekeep Mysteries
- Curse of Strahd
- Dragons of Stormwreck Isle
- Ghosts of Saltmarsh
- Giants of the Star Forge
- Icewind Dale: Rime of the Frostmaiden
- Keys from the Golden Vault
- Phandelver and Below: The Shattered Obelisk
- Planescape: Adventures in the Multiverse
- Tal'Dorei Campaign Setting Reborn
- The Wild Beyond the Witchlight
- The Book of Many Things
Future digital and physical products will launch with their maps already configured for use here, and books released previously will be added over time, so expect to see this list grow.
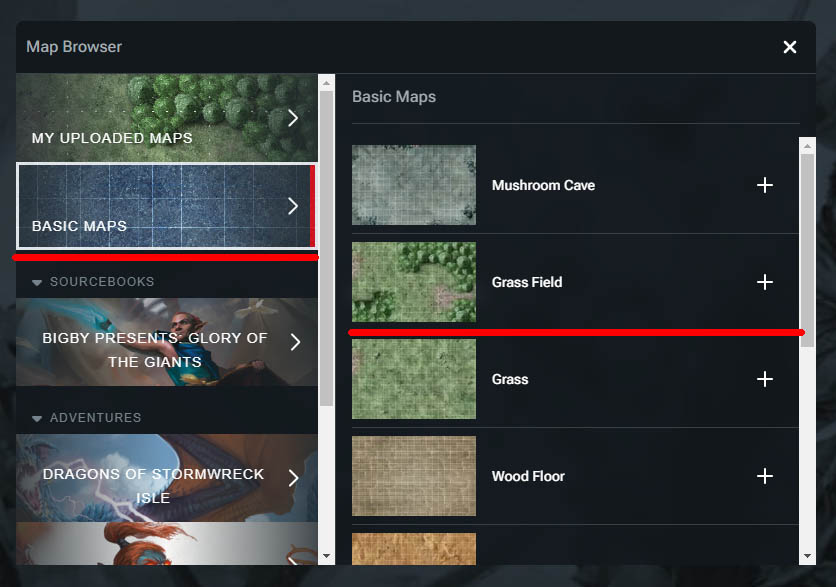
To start, let’s add a basic map, so click that category. You’ll see the right-hand panel populated with a list of maps. Add the “Grass Field” map by clicking the “+” sign to the right.
In the bottom left of the screen, you’ll see the message, “Added ‘Grass Fields’ to the map list,” but not much else. This is because while the map has been added to the list, we still need to select that map to view it. Click the “X” in the top right corner to close the Map Browser, then click the down arrow next to “Select Map” to open the dropdown.
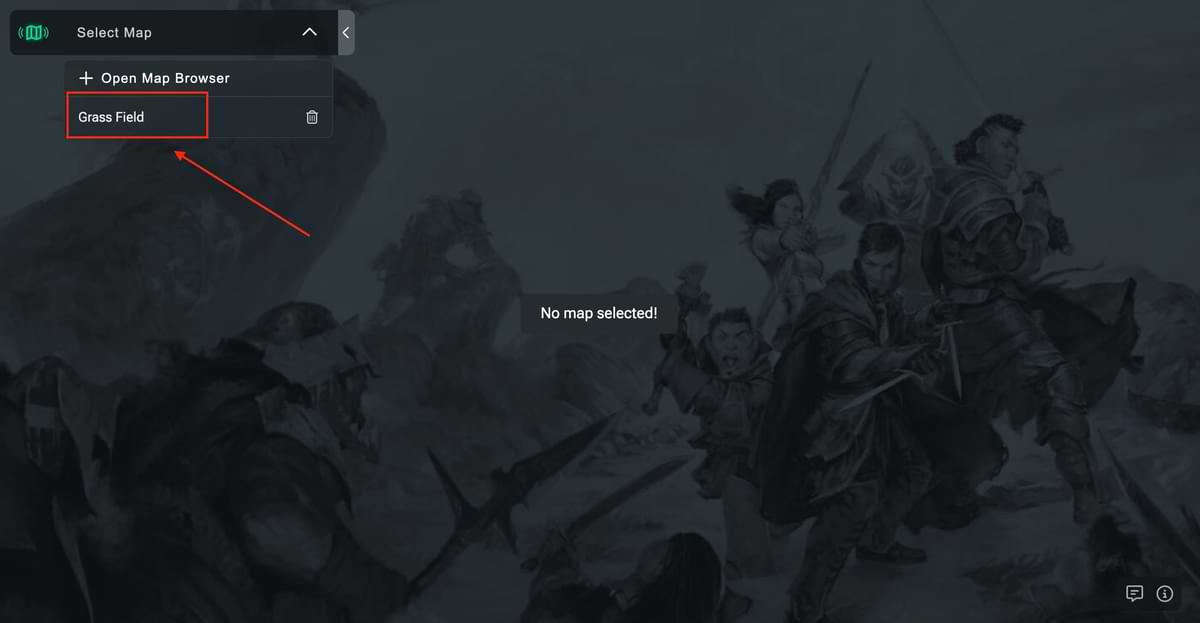
Now you’ll see the “Grass Field” map listed, with a trash can icon to the right. You can click this icon to remove a map from your list, but for now, let’s select the map by clicking its name. You will now be looking at your first map!

If you want to add more maps, you can repeat the above steps, and they’ll be added to your map list. You can switch between maps at any time by expanding the map list and clicking the map's name.
Uploading and Scaling a Map
Even with the massive selection of maps available across the library of official D&D books, you may still want to upload your own. With Maps, this is a simple endeavor!
To do this, select “+ Open Map Browser” to open the Map Browser again. Now, instead of selecting a ready-made map, we’re going to select “My Uploaded Maps.” Because we haven’t uploaded anything yet, click “Upload Map,” which will open the “Add Uploaded Map” dialogue.
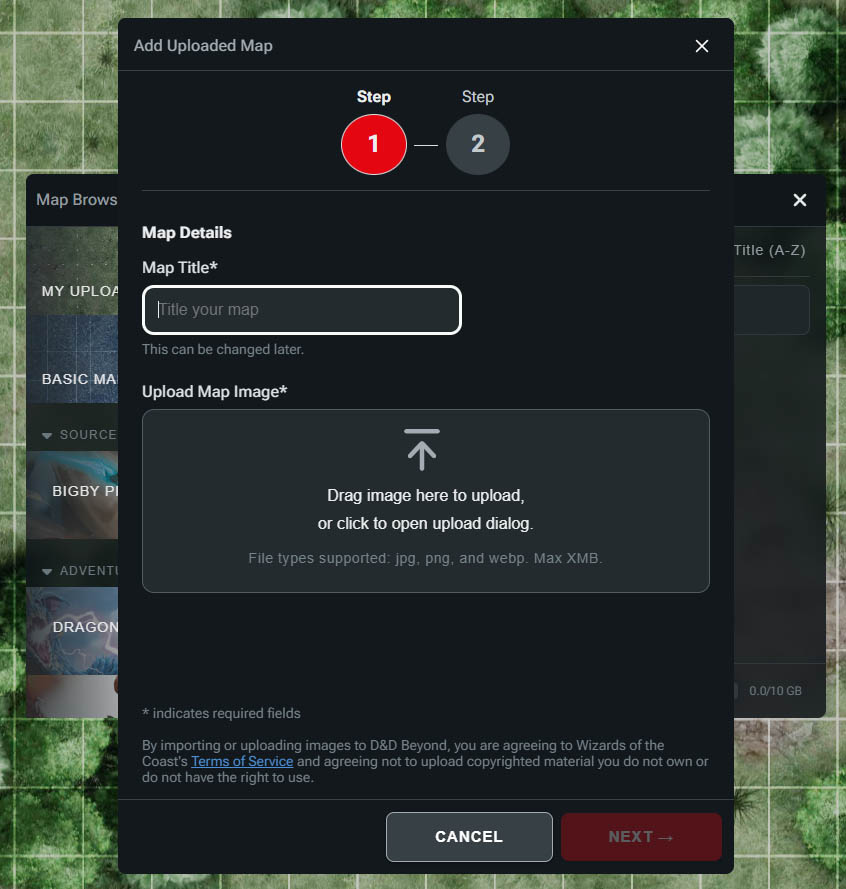
First, give your map a title, and then you can either drag your map into the upload area or click the area to open your computer's file browser. Make sure that the map is the right file type, and keep in mind that Maps comes with a 10 GB total storage limit per user. It’s also important to pay attention to the terms of use at the bottom of the dialogue regarding what images you upload.
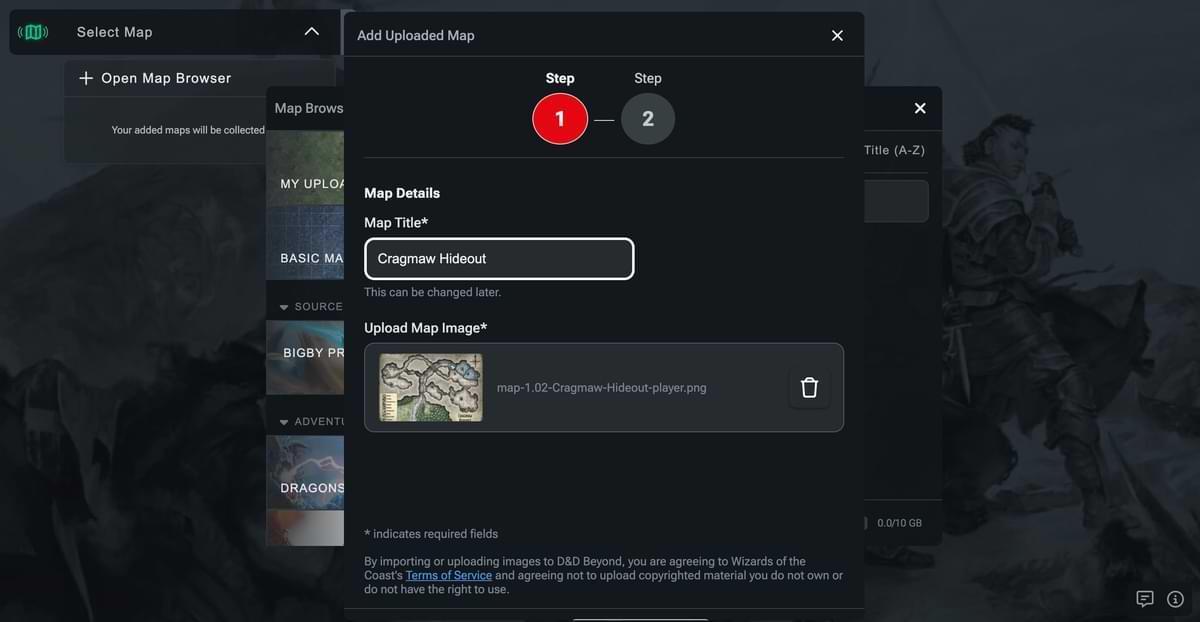
Once you’ve uploaded your map, click “Next,” and you’ll be taken to the scaling dialogue. Here you set the scale of your map.
In the middle of the map preview, you’ll see a white circle surrounded by dotted lines, three smaller circles, and a red arrow. The larger circle represents a Medium-sized token, the lines represent grid lines, and the smaller circles represent the corners of a grid square. You want to align these dotted lines and corner markers with the grid of your map if it has one or adjust the scale of your token to suit the map if it doesn’t have a grid.
First, click and drag the large white circle so the top left corner marker is aligned with the corner of a square on your grid.
Then, click and drag the red arrow in the bottom right to rescale the token and the markers. You want to scale it so all the corner and grid line markers line up with the grid on your map.
If you can’t see enough of your map to align things properly, you can click the "-" and "+" icons in the bottom right to zoom in and out.
Once you have everything aligned to your liking, click the “Save” button. You can also click the “Cancel” or “X” button to exit the process, or the “Back” button to change the map you’re setting up.
Now we have a map uploaded and scaled correctly, we can click the “+” icon to add it to our map list, from which we can select it for play.
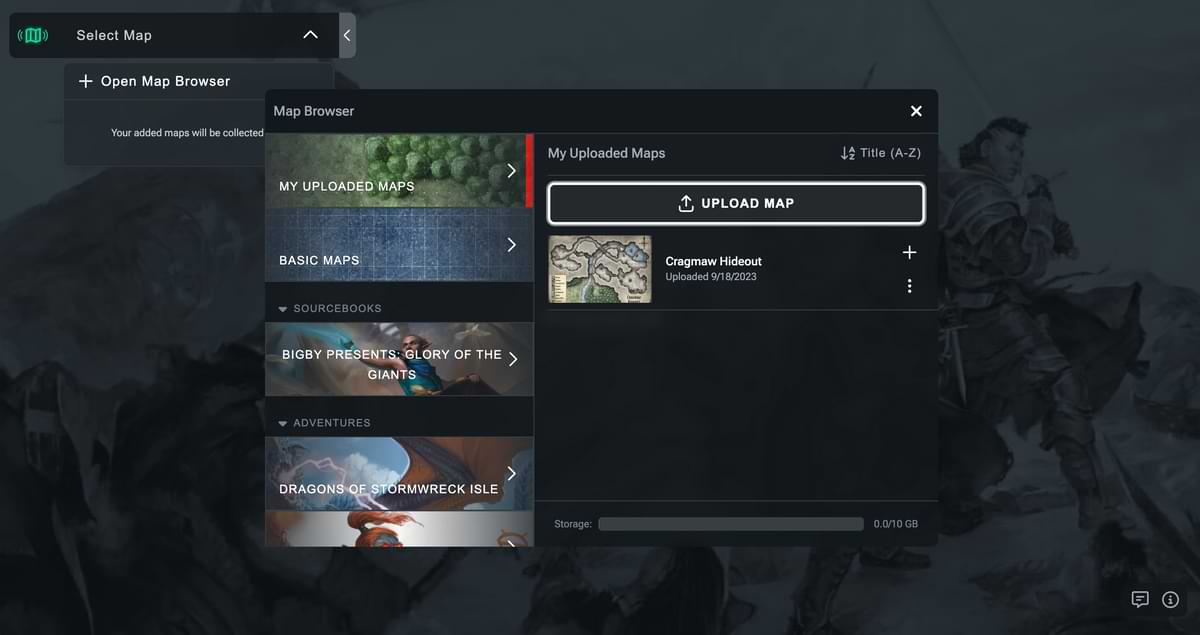
If at any time you want to remove or edit the map, you can do so from the “My Uploaded Maps” section of the Map Browser. Just click the three vertical dots next to any map to access the “Edit” and “Delete” options. "Delete" will remove it from your library of maps, while "Edit" will allow you to rename the map and adjust any scaling.
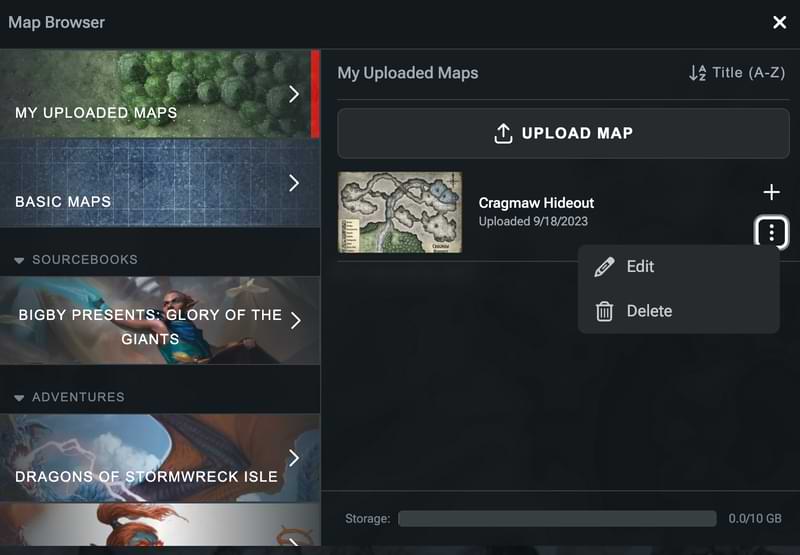
Once you’ve uploaded a few maps, you may want help finding and managing them. In the top right, you can change the sorting order of the maps, while at the bottom of the menu, you can see how much of your storage you’ve used.
Adding Tokens
So we’ve got a map, but it’s not much use without some tokens, is it? You may notice that once you’re viewing a map, three new buttons appear on the left side, below the map dropdown. We want the third button on that list, which is shaped like a figure with a circle around it—the Token Browser. You can access it by clicking it or pressing "V" on your keyboard.
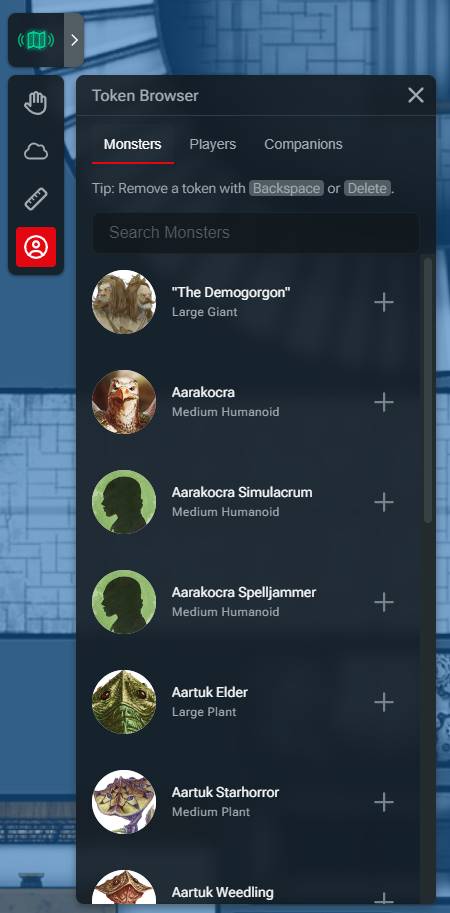
With the Token Browser open, you’ll see three tab options: “Monsters,” “Players,” and “Companions.” First, let’s add a monster. You’ll see a list of monsters with their official art along with their name, size, and creature type. You can even search monsters using the “Search” field. Let’s add some goblins.
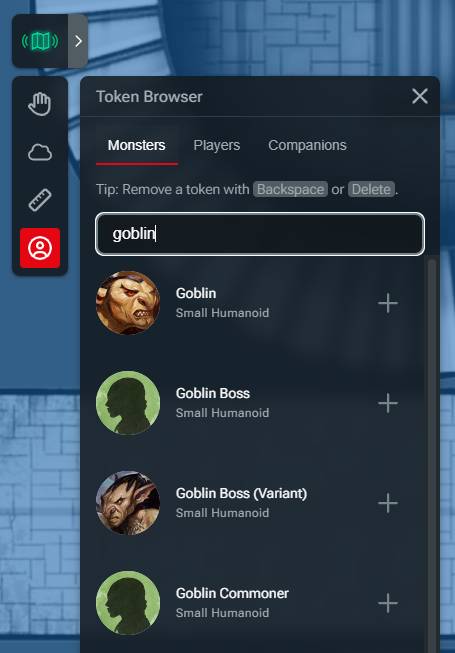
To the right of each monster, you’ll see a “+” icon, which you can click to add the token to the map. Let’s add three goblins and a goblin boss (variant). You’ll notice that each time you click the “+” button, a token will appear in an empty space, so you don’t have to worry about them stacking up on each other messily.
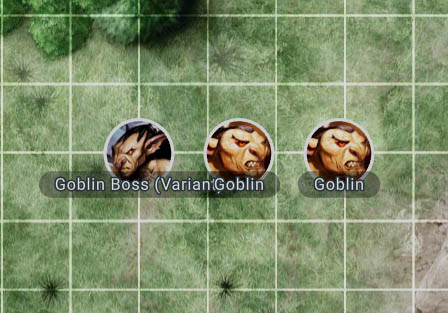
You’ll notice that the monsters display their names and are automatically set to the right size based on the scale of your map. If you add a large creature, say an ogre, it’ll be scaled to 2x2 squares automagically!

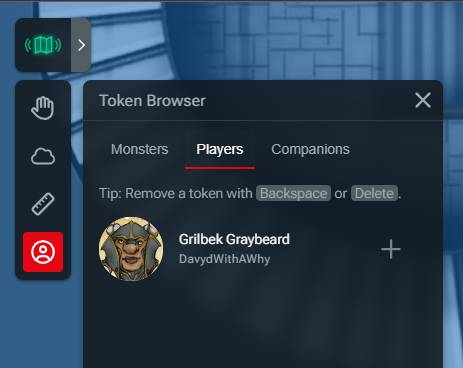
Now that you’ve added some enemies, it’s time to add the player characters. Navigate to the “Players” tab, where you’ll see all the characters currently in the campaign you selected. You’ll see the name of each character as well as the art they have selected on their character sheet.
Clicking the “+” button will add that player's token to the map. Once you’ve invited each player to the map, they’ll be able to control their own tokens and move them around the map.
The “Companions” tab is the final option in the Token Browser and is where you’ll see any creatures that your players have added to the Extras section of their character sheet. Grilbek has a draft horse mount called Gallahop, so we’ll add them to the map as well by clicking the “+” icon.

You can close the Token Browser at any time using the “X” button in the top right.
Navigating the Map
So you’ve got a map with some tokens, the next step is navigating the map. From the list of three buttons, select the Hand Tool, the first button with the hand icon. Alternatively, you can press the “H” key on your keyboard. With this tool selected, you can do two things:
- Click and drag to move around the map
- Click and drag to move tokens around the map
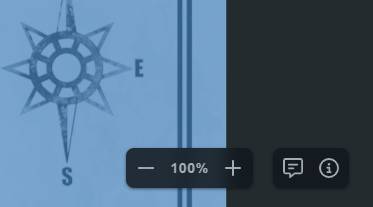
You can also use the mouse wheel to zoom in and out, but this function is accessible regardless of what tool you have selected. Additionally, you’ll find a zoom control in the bottom right that displays a "+" and "-" icon to zoom in and out, respectively, as well as your current zoom level.
Navigating Maps and Moving Tokens on Mobile
Navigating maps on mobile devices works pretty much as you would expect. Press and hold on an area of the map, then move your finger to drag the map around and pinch to zoom in and out. Tokens can be tapped to select them, and then dragged in the same way you can drag the map.
As a reminder, Maps functionality on mobile is still in development, so your experience may not be ideal!
Controlling Tokens
Once you’ve placed tokens on the map, you and your players can begin controlling them. It’s important to note that, currently, anyone viewing a map can move any token on that map, so it is possible for players to move monsters and each other's tokens.
To move a token, make sure you have no tool selected, then click on a token so that its border turns red. The token will appear to lift up from the map. You’ll then be able to drag the token around, and the token toolbar will display above that token. Clicking anywhere else on the map will cause the red highlight ring and toolbar to disappear.
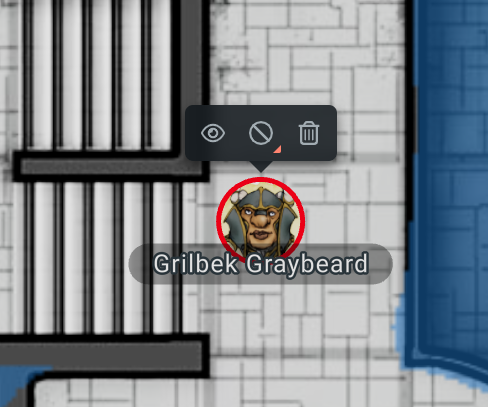
The Token Toolbar has three useful features:
- Hide/Reveal options
- Border Color options
- Delete button
Hide/Reveal Options
The Hide/Reveal tool is a tool accessible only by the Dungeon Master. It allows the DM to render a token hidden from the players or reveal that token. Clicking it causes the token to desaturate, and the eye icon displays with a line through it, indicating that the token is hidden. Clicking it again reveals the token.
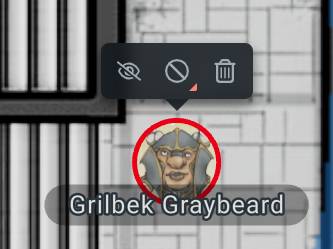
You can also toggle a token’s hidden/revealed state with the keyboard shortcut “Shift + H.”
Border Color Options
The Border Color tool allows a DM or player to place a colored ring around a token, enabling easier identification of that token. You can use this border color to differentiate between different tokens of the same monster type, conditions, or who controls a given token. To access the color picker for the Border Color tool, click the icon of a circle with a line through it, which indicates that no color has been applied.
This will bring up the color palette of border colors. Selecting any one of them will apply that color to the token.
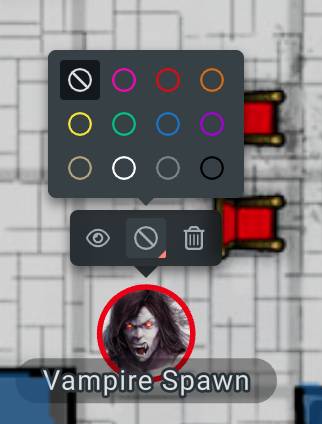
To remove a border color, open the picker again and click the circle with a line icon from the top left.
Delete Button
The Delete button adds a new way to remove tokens in addition to the “Delete” and “Backspace” keyboard shortcuts.
Fog of War
As a DM, you may want to limit how much of the map the players can see at any given time. This is where the "Fog of War" tool comes in. To open the menu for fog of war, click the icon that looks like a cloud or press “F” on your keyboard. As long as this tool is selected, you’ll see four options:
- “Cover All”
- “Reveal All”
- A paint roller icon
- An erase icon
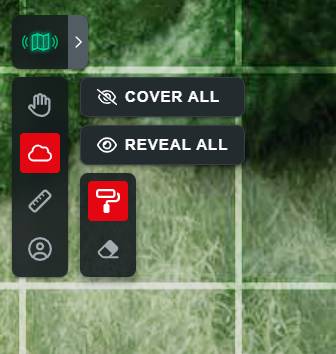
The first two options will cover the entire map in fog of war and clear the entire map, respectively. As long as an area is covered by fog of war, your players won’t be able to see that part of the map, but you will. The third icon lets you selectively paint fog of war on an area of the map, and the last icon lets you remove it.
Let’s apply some fog of war to the Crawmaw Hideout map we uploaded previously. As the players enter, they can only see the tunnel straight ahead of them. First, I use the “Cover All” button to fill in the whole map and save me some time. Then, I select the erase icon and reveal what I think the character should be able to initially see.
When the players move so they can see another room, I can use the eraser to reveal more areas of the map for my players to see, or the paint roller to obscure more areas should they lose line of sight.
Using Fog of War on Mobile
When using the Fog of War feature on mobile, you can’t move the map around while you have the paint or erase tools selected, so you’ll need to switch back to the Hand Tool in order to zoom or pan the map. However, with the paint or erase tool active, you can simply draw with your finger where you want to add or remove fog of war.
Ruler
If you or your players want to measure the distance between features or tokens on the map, you can do so with the Ruler tool. Either click the ruler icon in the toolbar or press “R” on your keyboard, and you’ll be able to measure distances on the map.
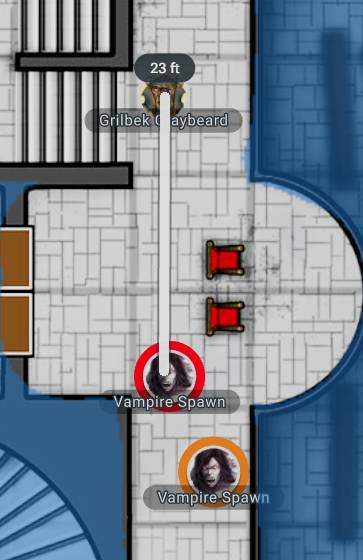
To measure, click and drag from your starting point to the point you’d like to measure to, and the straight line length will be displayed in feet. This distance is automatically scaled based on the map. The ruler is only visible to the person using it, so don’t worry, it won’t give things away when you’re measuring to see if that red dragon's Breath Weapon will reach your paladin!
Inviting Players to View the Map
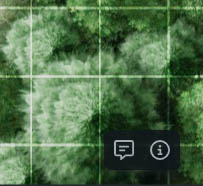
You’ve got a map, you’ve got tokens, and maybe you’ve even got some fog of war. But you haven’t got the most important part of any D&D game yet, your players! In the bottom right of the map screen, you’ll see two icons, a speech bubble and an “i” in a circle.
Click the “i” icon, and you’ll see the “Invite Link” and “Map Link” options. Invite Link copies the campaign invite URL if you want to quickly add new players to your campaign. However, the player we’re adding to the map is already in the campaign, so we’ll click the Map Link button. This will copy the URL for this map to your clipboard so you can share it with your players.
If a player follows this URL, they’ll be brought to this campaign's map, where they’ll see the selected map and any tokens, and will also be able to control any tokens associated with their character sheet, including companions.
Game Log
The last important feature of this Alpha release is access to the Game Log. If you click the speech bubble button in the bottom right, this will open the Game Log for your campaign.
All rolls made in the campaign, including from character sheets, the encounter tool, and discord if you’re using the Avrae bot and it’s linked to your campaign, will appear here. Also, the same visibility rules will apply, so the rolls the DM makes in secret will only be visible to the DM here.
The Game Log will stay open until you close it, either by clicking the speech bubble button a second time, or clicking the “X” in the top right.
Safety and Feedback Tools
The last feature is by no means the least important, and that’s the reporting and feedback tools. These can be accessed by clicking the “i” icon, and then selecting the three vertical dots. From there, you’ll see two options; “Report Image” and “User Feedback”.
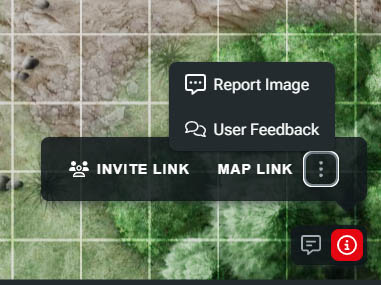
User Feedback takes you to the feedback portal for Maps Alpha, but Report Image is an important tool for ensuring your safety. If at any point you encounter inappropriate images in Maps, either as a map itself or a token, you can use this option to access our support portal. From here, you can report the issue and help make sure that D&D is a safe and welcoming space for everyone.
Drop in a Map and Start Playing!
So there you have it, the Alpha version of D&D Beyond Maps! While these are all the key elements you need to get started running combat using battle maps, there’s still more to come for this new tool. Some exciting features you can look forward to in the future can be found in the “Our Roadmap” section of the Maps homepage! As a reminder, you can also see major updates to Maps in the D&D Beyond Changelog.
This article was updated November 14, 2023.
Davyd is a moderator for D&D Beyond. A Dungeon Master of over fifteen years, he enjoys Marvel movies, writing, and of course running D&D for his friends and family, including his daughter Willow (well, one day). The three of them live with their two cats Asker and Khatleesi in south of England.
-
View User Profile
-
Send Message
Posted Sep 19, 2023Can't wait to hear everyone's feedback for this exciting new D&D Beyond tool!
-
View User Profile
-
Send Message
Posted Sep 19, 2023YESSSSSSSS!!!!!
-
View User Profile
-
Send Message
Posted Sep 19, 2023This is AWESOME! Thanks to everyone behind it for their hard work!
-
View User Profile
-
Send Message
Posted Sep 19, 2023Very excited to try this out with my groups, can't wait until more modules are supported natively.
-
View User Profile
-
Send Message
Posted Sep 19, 2023This is awesome! :D
-
View User Profile
-
Send Message
Posted Sep 19, 2023Really needs generic blank medium, large, and huge icons we can name ourselves. I know it's super alpha and all that, but that's exactly why we need a more flexible option for makeshift objects or what have you.
-
View User Profile
-
Send Message
Posted Sep 19, 2023Awesome, finally I can be dumb yet act like I know what I'm doing when giving directions. I'm being serious when I say that.
-
View User Profile
-
Send Message
Posted Sep 19, 2023Glad to see something like this become available. Looking forward to playing around with it. Or maybe two rounds...
-
View User Profile
-
Send Message
Posted Sep 19, 2023Couple thoughts. First of all, we have been using Abovevtt and love it. It looks like this works much the same. Is this done in partnership with Abovevtt? Also, consider the hero tier subscription. We have multiple DM's in our group. A couple of us have hero tier with one person having master tier. This allows us all to share content without all of us needing to be master tier. Please open to hero as well.
-
View User Profile
-
Send Message
Posted Sep 19, 2023Can we upload our own tokens? Similarly, can we use tokens from content we haven't unlocked / source books we dont own?
-
View User Profile
-
Send Message
Posted Sep 19, 2023Cool feature! It's great that you were able to break the news Davyd. And it makes me feel slightly more confident that this website may be doing a bit more than just maintenence.
-
View User Profile
-
Send Message
Posted Sep 19, 2023AboveVTT 2.0?
-
View User Profile
-
Send Message
Posted Sep 19, 2023This is super exciting! I am glad to see something like this come to D&D beyond, and it makes me happy to be a master-tier subscriber. I look forward to seeing future developments and updates.
-
View User Profile
-
Send Message
Posted Sep 19, 2023Incredible
-
View User Profile
-
Send Message
Posted Sep 19, 2023Please focus on basic features before moving on to competing with other parts of the digital DnD ecosystem.
The #1 request for DMs is to allow us to limit sources: https://slyflourish.com/limiting_sources_in_dnd_beyond.html?rss=1
I can't buy any new DnD digital books until this feature is implemented. We've been waiting years at this point for something basic such as this.
-
View User Profile
-
Send Message
Posted Sep 19, 2023Curious, will we have to have purchased the monsters to be able to use their tokens? Using a token doesn't give one access to the stats of the creature, so I would hope all tokens would be made available.
-
View User Profile
-
Send Message
Posted Sep 19, 2023This feels more like owlbear rodeo but with less features in the parts that matter. I think I might stick to roll20 or other VTTs for now...
-
View User Profile
-
Send Message
Posted Sep 19, 2023YAY!!
-
View User Profile
-
Send Message
Posted Sep 19, 2023Right now players can move ALL tokens not just the ones associated with their Characters. Excited to see where this goes.
-
View User Profile
-
Send Message
Posted Sep 19, 2023Very psyched to try out the map tool, one step closer to D&D Beyond being my one-stop-shop for fantasy adventure!